The Body Shop Skin Care Routine💦

 
 So one of my New Years resolutions was to improve my skin care routine, considering the last couple of years it mostly consisted of cheap face wipes which really did nothing for my skin! I know it’s almost May, but I finaaaaally sorted out a routine which has honestly improved my skin dramatically! 

If you’ve read my previous blogs, you will know how much I rave about the Tea Tree collection from The Body Shop. Hands down this is my holy grail when it comes to fully cleansing my skin! I’ve never been a massive sufferer of acne, but my skin can be very prone to annoying little blemishes! I cannot express enough how much the Tea Tree products have seriously fixed this problem! I own the foaming cleanser, toner and spot gel. I will wash my face with the foaming cleanser morning and evening. In the evenings, I’ll apply a small amount of toner over my face to ensure everything is fully cleansed. 

Although I love this little routine, I felt I was missing out a key part – moisturising. This worked well, until I began to notice how dry my skin had become. My skin felt so tight and dried up! I put all my trust in the body shop, and decided to look further into their collection. 

I wanted to purchase a facial mask. One of the items I purchased was the ‘warming mineral mask’. This product works by rubbing onto damp skin, spreading evenly in circular motions. Leave the cream on for around 5 minutes and then rinse of with warm water. Other than the incredible results this product leaves, I love that the cream heats up on your face. This shows the product is working by opening and cleansing your pores. When rinsed off, this product leaves my skin silky smooth and refreshed. I’ve found some facial masks have felt very gritty and tight once removed. I used to purchase some face masks from Lush, but I hated the feeling after; my skin would feel exactly the same and after months of using them nothing had changed. After just one wash with this facial mask, my skin had dramatically changed! Please bear in mind every skin type is different, but this works a treat for me! This product is very deep cleansing, so I would reccomend using 1-2 times a week. You only need the tiniest amount, which shows how long the product will last! 
  After reading up other reviews, I found the ‘Oils for life’ collection, which SO many people have been raving about! This collection claims to deeply hydrate your skin, giving a radiant finish. The products are made with 99% oils of natural origin. The oils are aimed to sink into your skin, adding natural hydration, leaving you with a elastic feeling. 


INTENSELY REVITALISING FACIAL OIL
     
This product is a leightweight daily facial oil. The packaging states, this product is made up of three seed oils; Black Cumin seed oil from Egypt, Camellia seed oil from China and Rosehip seed oil from Chile. Sounds complex? But basically, these oils have been specifically hand chosen and tested as high quality ingredients that show immediate effects on the skin. 1-2 drops of this oil onto the skin can intensively hydrate and radiant the entire face almost immediately. Okay, so a lot of brands ‘claim’ that their product shows instant results after 2-3 goes? But honestly, just one use of this product and my skin felt complelty reborn. This is an expensive product priced at £28 for a small bottle, but at the end of the day, you only get one face and one set of skin, so I believe you deserve to treat yourself. This product works very well for aged skin too! The oils help to add an elastic touch to the skin, making it feel and appear less wrinkled. I know I don’t have aged skin as I’m only 18, but the hydration this product gives is insane. It claims you can wear the product all day, but as a makeup user I much prefer it at night, with a bare face. 
Plus not to mention, the packaging is gorgeous!!! The bottle is a small bronzey colour, with an ombré going through to a pale yellow. It has a very Moroccan feel to the look. 
 

OILS OF LIFE SLEEPING CREAM
     
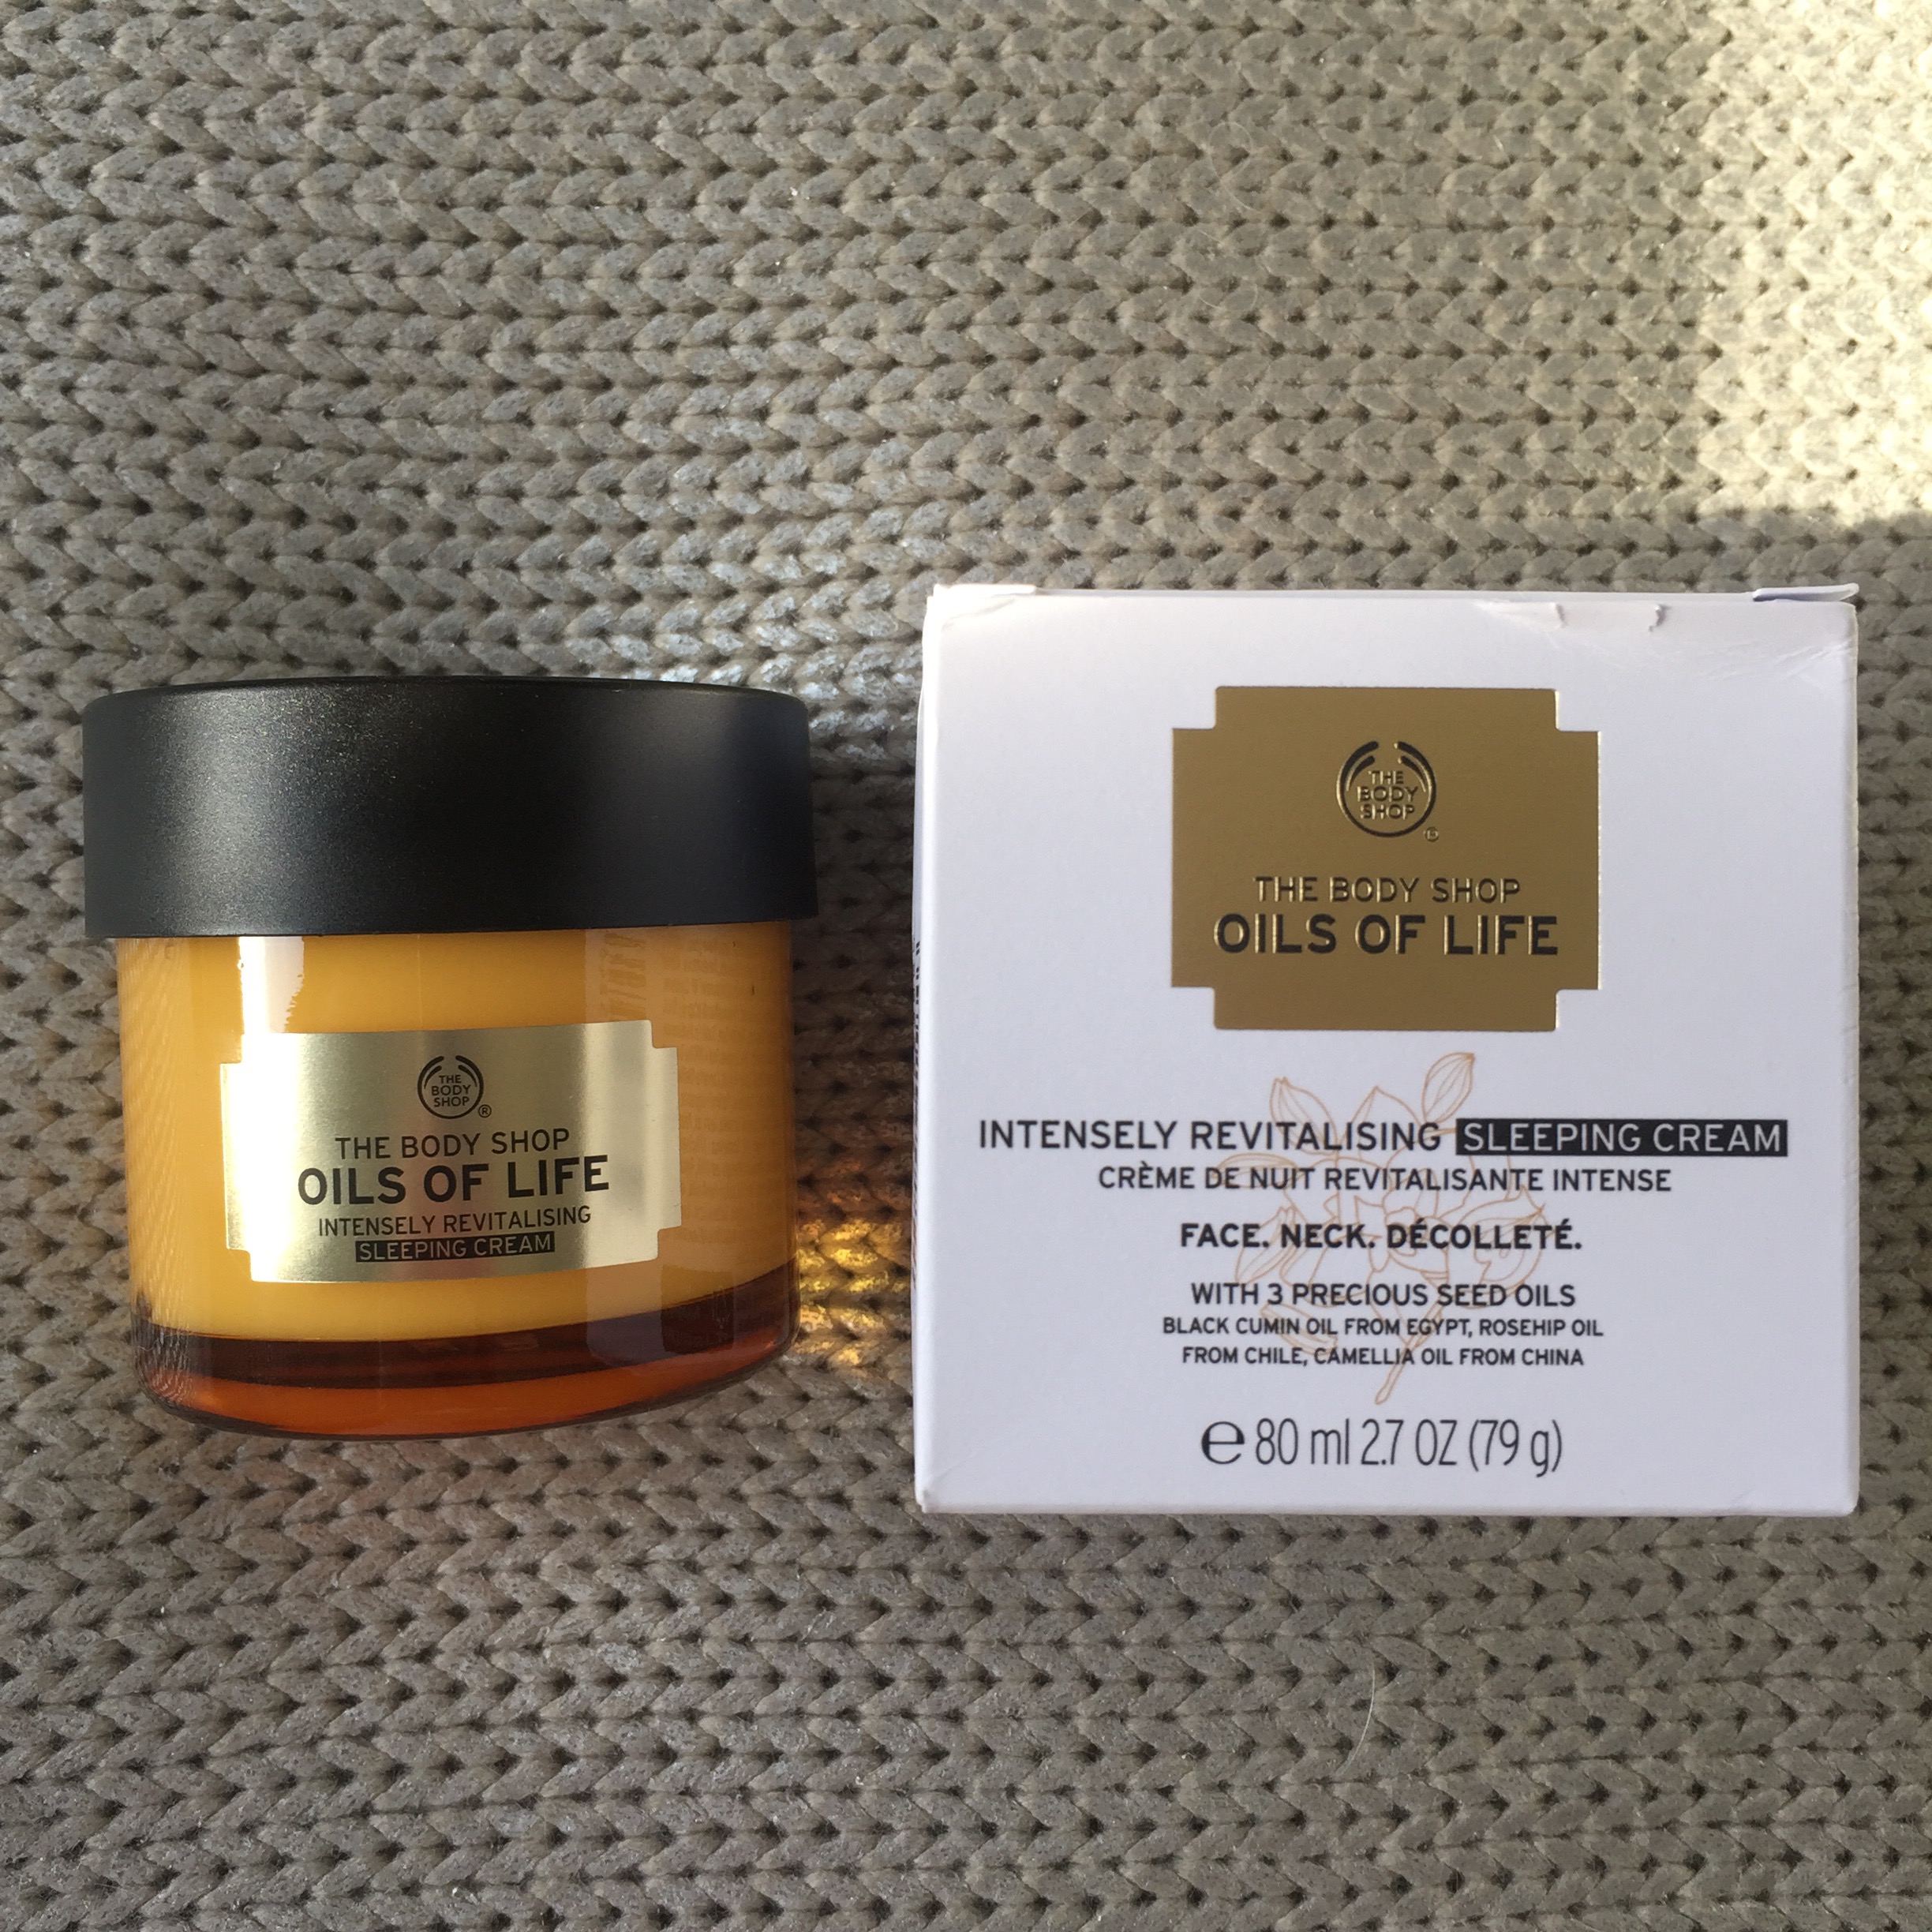
Another product from the ‘oils for life’ collection, would be the sleeping cream. I’m not a huge lover of wearing moisturiser under my makeup, therefore I settled for a sleeping cream, which I can apply at night. Like mentioned before, the oils for life collection works very well for ageing skin, but I use it due to its high nourishing ingredients. Everything within this product is extremely natural. It makes my skin feel and look visibly radiant and rested. I’ve felt much more awake and happier with the way my skin looks. The cream is very rich, due to it being a night cream, and gives the most beautiful scent. It works very well with the oils for life faical oil. Like before, this product is on the expensive side with it being £28 a tub, but you pay for the quality! 
 Lastly, I want to discuss the body shop Shea body butter. This is one of the stores best selling products. I am one of the fussiest people when it comes to body butters, but I cannot fault a single thing about this product at all. First of the smell. All I can say it wow, it smells like absolute heaven! I feel the smell is very important in a body butter. You want a smell that isn’t too strong, but when your nose is close, you pick up some of the scent. It has a very nutty smell which I feel overall is very likeable. I’ve had some of the body shop body butters before and will admit, I found them very thick and non-absorbent, but this product instantly sinks into the skin. You only need a tiny layer to create a creamy coverage over the skin. A key factor with body butters, is you want something that can sink into the skin without being left all sticky! I’ve never felt so awakened and freshed! This is my go to product now, and I use it every day and night!
   
So there you have it! All my views are completely my own! Hope this helped any of you looking to spice up your skin care routine. I really recommend the body shop, they are such a great quality and caring brand, who really do put their customers first. 
See you soon, Sophie. Xx

Tanning routine☀️

  
So a previous blog all about the products I have used to self tan myself, has a lot of you requesting my tanning routine. This will only be a little blog, but I feel it’s important to tan correctly, to avoid any little errors!  

First up, I will always have a shower before I apply fake tan. I feel this is important as it will remove any products previously on the skin such as deodorant or moisturisers. These products are what can prevent the tan equally distributing over the skin; resulting in patchy skin! 

Make sure you wash your body with a body wash containing more water than oils in the ingredients. Oils can strip away the tan, therefore Aqua based solutions help to keep the skin hydrated. 

Exfoliate!!!! I cannot stress this enough! Exfoliation helps to remove any dry patches of skin, to avoid the tan sticking. For exfoliation methods, I like to use a shower puff, to wash all my body, followed by either ‘Rub Rub Rub’ from Lush or ‘Scrub of your life’ from Soap and glory. Both products I highly recommend as I suffer from very dry skin on my arms and chest, and ever since using these products, this has reduced incredibly.  

  Choosing a good quality tanning mitt is always important. You want to choose a mitt that doesn’t absorb too much tanning product. I’ve found the best one I’ve used would have to be the St Tropez tanning mitt. You can buy them in most drug stores for around 3-5 pounds. Make sure you wash your mitt after every use, using hot soapy water. I tend to replace my tanning mitts around every couple of months, depending on how many times I tan. Helpful tip: purchase two tanning mitts, as when one is washing, you will always have another for back up! Basically- do not risk using your hands! 

The product I use, as you all know, is the St Moriz tanning foam.  I love this product so much and highly reccomend it! ( read my previous blog for more info ) 

I’ll pump twice on the mitt, working from my legs up to my neck. Sometimes I’ll apply tan on my face, but depending on your skin type chooses whether this is a good idea. I have fairly oily skin, and found tanning my face has left me with spots, therefore I use a foundation three shades darker. For more help, don’t be afraid to ask a makeup artist in one of the stores to match foundations to your tan. It’s so common for people to do this, even myself does so. 

Work the tan in circular motions ensuring that all areas of the body has been covered. For harder to reach places such as my back, I will work from the top of my neck down. If this is too difficult you can always ask someone to help you before you get to grips of the awkward bending and turning haha! 

I’ll leave this overnight (dont have white bedding), and wash it off in the morning using the body wash. I’ll do this every couple of days, and top it up with St Moriz instant mist, whenever I feel it needs a top up. 

When the tan becomes a lot more flakey showing signs of wearing, I’ll scrub it off with the my exfoliating scrubs. 

Ensure to keep your skin moisturised to avoid the tan becoming flaky straight away. The moisturiser I like to use would be the ‘dream cream’ by Lush. This product can be heavy on the skin, so I choose to apply it in the evenings before I go to bed and let it sink in over night.   

 Hope this helped, I’m always up for suggestions on anything else you want to find out more about ☺️

Sophie xx 

The photos below are not mine but show a clear example of how the tan looks:


Smokey eyes tutorial💀

 Although it may look simple, achieving the perfect smokey eyes makeup look can be a lot more difficult then you may think! You’ll need three things to achieve the perfect look. 

1) Good quality brushes that enable you to blend the eyeshadows together without smudging the colours into one. 

2) Masking tape, for accurate application. 

3) A range of darker eyeshadows that can compliment one another. 

STEP ONE: APPLY MASKING TAPE

Obviously before any makeup look, you want to ensure that you have FULLY cleansed your face. When applying heavy eyeshadow, I find it easier to apply foundation after, as sometimes the eyeshadow can drop under the eyes, resulting in you needing to wipe it away. Apply masking tape to the bottom of your eyelids, following the natural lining of your eye. For example, if you have long eyes, you may not want to extend the length of your eyes, therefore you would raise the tape slightly following the highest point of your lower lash line. I have fairly small eyes, therefore I want to make them appear bigger. To do this I will extend up the masking tape to give a slight illusion. Keep the masking tape on your eyes until the eyeshadow look is complete. 

STEP TWO: APPLY A PRIMER 

I prefer doing this step after the tape as I find the tape is harder to stick around the eyes when the skin is moist. A primer is optional, but I’ve found that it helps to kept the eyeshadow on the eye lids longer. One of my personal favourites would either be the Nars smudge proof primer or the Urban Decay famous primer. I find primers can be fairly expensive, therefore I have learnt some cheaper tricks. I’ve found that applying concealer to your eyes can work as a primer. All you really need is something for the product to stick to.

STEP THREE: START WITH THE DARKEST COLOUR FROM THE OUTER CORNERS 

I like to choose a dark colour, usually a charcoal or black colour, and apply this to the edges of the eyes. Lightly brush the colour inwards on the eyes. The trick is you want to brush the eyeshadow in towards the corners of the eyes leaving a slight point on each outer corner. If you brush the eyeshadow in circular motions, you will simply achieve a panda eyed look, not pretty. 

STEP FOUR: MEDIUM SHADE

Next, you are going to want to pick a shade slightly lighter, but not the lightest. Apply this eyeshadow to the centre of the eyelid. Don’t be afraid to go on top of the darkest colour. 

STEP FIVE: LIGHT SHADE

Now you are going to want to pick the lightest shade in your eyeshadow palette. By contrasting all these different shades you will be able to create a gradient of colours on the eyes. 

STEP SIX: BLEND BLEND BLEND

Now for the part most people may go wrong at. It is very important to pick a brush that can blend the colours not mix. You want to be able to still see the different shades merging, not one complete colour. I like to use the Zoeva blending brush to do so. I’ll start by working the darkest shade into the medium, then lightest. Work lightly, as brushing too hard can mix. You want to lightly smudge the colours. Don’t be afraid to add more colours if you feel the look isn’t bold enough for you. 

STEP SEVEN: LASHES

Next step, eyelashes! You can apply mascara, but I much prefer false eyelashes to complete this party look. My favourite brand of eyelashes would have to be the ‘Eylure’ lashes from most drug stores. These eyelashes are very affordable and with proper cleaning and handling, they can be reused many times! For this look I recommended long, bold and wispy eyelashes. You want to be able to open up the eyes. 

STEP EIGHT: GLITTER

To finish of this look on the eyes, I like to apply a drop of glitter. This helps to add a bit of sparkle to spice up the look. You can never go wrong with glitter. I tend to apply this in the inner corners of the eyes and centre shadow. 

So there you have it! My own take on smokey eyes! Gently peel back the masking tape to reveal a gorgeous straight line defining the eyes. I love using masking tape as the look is so neat and mistakes are a lot harder to make. If you wanted, you can always add eyeliner. If so, apply eyeliner following the masking tape line, if you find it tricky to achieve an even look. 

Hope you enjoyed this little look, see you soon☺️

Sophie xxx


My everyday Spring makeup look🌸

   
 ITS FINALLY SPRING🌸 I love this time of the year because it’s still a little chilly but the skies are blue and the suns out (most of the time). In the summer I tend to wear a lot less makeup, so I usually stop applying concealer/powders, and switch to a BB cream. But since it’s not quite hot enough, this is my go to makeup look for this time of the year! Enjoy😘

First of, I will always make sure my skin is FULLY cleansed. When I’m in the shower I will use the body shop foaming cleanser in the Tea Tree collection to help remove any blackheads or blemishes from my skin and freshen it up! I love this product because my skin can become fairly oily, therefore this product helps reduce the levels of oils on my face, without drying my skin completely. Plus, this product really helps to waken my skin in the morning, without leaving it feeling tight.☺️ Helpful tip: when washing your face, try finishing off the process by quickly washing your face with cold water. This helps to close your pores again to reduce any bacteria contaminating your skin😝

After drying my face, I’ll then take a tea tree face wipe from the same body shop collection and wipe this gently across my T-zone. This helps to ensure all the dirt is removed from my face. To some people this step may be unnecessary, but I sometimes suffer from spots and blemishes, and I’ve found that doing this step has cleared my skin massively!💓 

I will then apply my Mac prep and prime lotion all over my skin to get my face ready for the makeup. I love this product as it adds a slight shimmer over the skin which can look so pretty in the sunlight!✨ I’ve also found that having a primer really helps the overall appearance of my makeup. If I want more of a subtle look, I will use my Pore Professional primer from Benefit, which again provides fab coverage☺️

Next, using my real techniques buffing brush, I will apply my Mac Studio Fix foundation in shade NW15 all over my face. I love this foundation as it gives me a great coverage but also a gorgeous glow. I feel this product feels a lot lighter on the skin than my other foundations, therefore i use this in the day time. This is a shade darker than my natural skin tone, but because I apply fake tan a lot, it is matched to that🙈

I’ll then take my real techniques small contour brush and apply some concealer under my eyes. The concealer I use is the Collection 2000 concealer in shade 1 fair.   I love this concealer as it is the only product that has managed to cover the huge bags under my eyes! Little bit of advice, I’ve found bringing the colour down my face in triangular shapes helps to give a lovely glow to my face!✨ I will then take the same brand concealer in shade 2 medium to add a slight contoured shadow to my check bone and side of my nose. I’ll use my Mac 133 brush to do this. I love this brush as it is so soft and fluffy!☺️

Next I will apply bronzer to my cheekbones. For bronzer, I use my Mac mineralize skin finish powder in shade ‘Dark Golden’. I love this as its not too dark for my complexion and applies lightly to the skin. The brush I use to apply is my Smashbox bronzer brush.🌸

One of my favourite products would have to be my Nars blusher called ‘Orgasm’. This product is so fantastic and gives a gorgeous pink/gold tone to the cheeks. This is my go to blusher for this time of the year as it sparkles in the sunlight✨ As you can see by the photo below, I’ve had this product for a VERY long time as it most defiantly looks used😂 but there is still so much product left! So worth the money!

  
To apply I will use my Zoeva blusher brush! I love this brush because it is slightly angled to give perfect application. 

I’ll then begin to fill in my eyebrows. For my brows, I use the Kiko eyebrow kit in shade 01. I love this product as the shade suites my skin so well and provides full coverage all day! The product comes with a wax/gel, and two powders. I use the darker powder to outline my eyebrows and the lighter to blend them out‼️

Now time for my favourite part, EYESHADOW💞 So to make this look Spring themed, I like to use my Naked 3 palette. I got this as a gift for my 16th birthday and I think I’ve used this almost everyday? THERE IS STILL SO MUCH LEFT! Yes, this product was expensive for eyeshadow but the amount of wear I’ve got out of it is incredible! What I love about Urban Decay eyeshadows would have to be how a little goes a loooong way! To start off the look, I’ll apply ‘Nooner’ which is a brown/purple colour to my outer corners of each lid. Using a blending brush I will work ‘Limit’ into the inner corners to blend this colour into an ombré style. I will add ‘Burnout’ lightly on top of the darker outter corners to give the look some texture and glitter. I’ll do the same for the lighter area but instead using ‘Dust’. To finish the look I’ll touch up my inner eye lid with ‘Strange’, which is a white/cream shade. This look will take me around 3 minutes so it’s great for a quick style! 🌸🌸🌸 plus it’s very pink ☺️☺️☺️

I’ve used a lot of mascaras on the market, but my favourite would have to be the ‘L’Oreal Paris mega volume’ with the bright pink packaging. This mascara is very cheap, and lasts all day! It makes my eyelashes appear double the length they really are! Such a good quality product. 

I always like to add a little bit of highlighter to give a gorgeous glisten to the Spring look! The highlighter I use is the Urban Decay ‘Naked Illuminated’ powder in shade ‘luminous’. I cannot rate this product ENOUGH‼️ It’s now very hard to purchase since celeb Kylie Jenner was seen using it, but if you get the chance I promise you won’t regret. I mean it’s basically glitter and how can you not love glitter?!✨

AND FINALLY, to finish off this simple and easy Spring look, I like to apply a coat of lipgloss. I’ll use my Chanel lipgloss in shade 166. Thanks to my gorgeous makeup lover best bud Emi, (who is a very bad influence when it comes to spending money on makeup) this is BY FAR my favourite lip product ever! It’s the most gorgeous glittery pink shade that looks so beautiful on. It completes the whole look! 

Hope you enjoyed this little insider to one of my favourite makeup looks☺️💓🌸💜

Sophie xxx


My top 5 tanning product experiences🍊

Having always been fair skinned, I’m not the best at getting a natural tan when it’s sunny outside. I inherited this gene from my mother who like me, is as pale as it gets. (love you mum) 😏

This isn’t always a bad thing, as because of it, I received my lovely and very light blonde hair, which I love💓! 

But, I do equally love being tanned, therefore after hours of sitting on sun loungers and just gaining a bright lobster effect all over my body, I turned to tanning products‼️ 

At first I was very excited; surely it will be so easy? I just simply buy any old self tanning product, wack it on and I’m good to go. 🤗 Oh my how I was wrong. The method just mentioned may be the easy route other people take, but being as pale as I am, this was not the case. 😖😖 

I have tried almost EVERY product on the market and received a wide range of results. So therefore, I’d like to share all my tanning tips and flaws with you below: ENJOY😜

1) Dove Summer Glow 

Okay, so when I was around the age of 15/16, I started getting into the idea of becoming a bit more bronzed when all my friends were doing it. This was mainly due to wearing shorts in PE and wanting to not look as white as a ghost.👻 

I wasn’t sure which product to use as I wanted a really natural look. At this age I wasn’t really into makeup or beauty so the world of cosmetics was a blur to me! My mother suggested this product to me, and all my friends had been pretty successful with it! 

I applied it like a body lotion, using my hands. This was a bit of a mistake as my hands would always appear darker then the rest of my body as I would sometimes forget to wash them after, oops🤐

The main issue I found with this product, is it didn’t have a colour guideline. By this, I mean the product came out white, and applied clear on the skin. This made it very had to see where I had actually applied the lotion😤! When I did applied even all over, the product didn’t actually look too bad! Now I’m 18 and going out more, I want a darker tanning look, so this product wouldn’t be ideal for me now; but as a 15 year old, it worked a charm.💎 It made my skin SO SOFT, which definitely is a bonus! Overall I would rate this product a 6/10, for the final look. If your going for something very natural and easy to keep up together with, this would be the right choice. You didn’t have to follow a strict routine to achieve a 24/7 glow☺️

2) Garnier Summer Body Lotion


After finishing my Dove bottle, I wanted to try something new but similar. My friend at the time recommended this product to me. Her tan looked so natural and gorgeous. She wasn’t the palest person, therefore I think this is why the overall end result looked different on her.😭 I bought it the same day and couldn’t wait to try it out! Like the Dove lotion, it applied on white, making it very hard to get a non-streaky finish. (Please bare in mind i bought this product a long time ago so it might be different to now!) 

I noticed that this product did give a better coverage, but the colour did not suite my skin type. It was a lot more orange than the Dove product. This may work fine for other individuals but did not look good what so ever on myself! 😤

The product itself had the most beauuuuuutiful scent🍇🍉🍒🍑🌸🌺 I feel this is vital for a tanning lotion! There is nothing worse than smelling the typical biscuit smell of self tanner on your body 24/7, yuck😝

Overall I would rate this product a 4/10😯😯

3) Sienna X Spray tans


It was around the year of 2014, when my family and I went on holiday to Dubai. I wanted a lovely tan to travel over with, as I knew we weren’t staying long enough for me to sun bathe!🤔 

My mum suggested to me the idea of getting a spray tan. This would be a lot easier, as I can leave it to the professionals as they know actually what colour is right for me. Oh how I was wrong! I can’t remember exactly what product I had applied to me for the spray tan, but I was so orange and flaked away so easily! This scared me for life, and I did not touch any products for ages!😰😱

 Just look at my poor mother and me below🙄🍊🍊🍊🍊🍊🍊🍊🍊🍊🍊🍊🍊🍊🍊🍊 
Anyways back to the point, it was coming up to prom, when my friend recommended to me getting a spray tan. At first all signs screamed NO! Just because I really could not relive my last experience.👎🏽 After seeing my other friends have a go on with the spray tan, I gave in and decided to just give it a go. Honestly I could not have been happier with my tan!☺️ It looked so natural and complimented my dress and hair so well! I loved prom and I feel my tan really helped add to the enjoyment! 

  
I’ve only ever used this product once, just because it was more on the expensive side. If there is a special occasion approaching then I would deffo recommended having a spray tan done, but using a high quality brand. Trust me, if it goes wrong, then spray tans can be a nightmare to remove!!👎🏽👎🏽

Overall I rate this product a 9/10☺️🌸

4) St Tropez Gradual Tan


I decided to try something on the pricier side. This tan gave me such a flawless coverage and lasted such a good quality of time (which is everything you want in a tan😍)

The main downside I found with this product, is that it cost quite a lot, and didn’t last very long. This may seem fine if you want to tan for a one off occasion, but if your like me and want a constant glow, then this hobby soon becomes expensive!😤 

I really reccomnd buying the tanning mitt with the product, as this mitt is absolutely fantastic at applying the product evenly, whilst not soaking too much up. Boooonus😎

I have a tiny feeling that when I used this product, at the time it didn’t have a colour guide and applied clear, but I feel this feature may have been altered recently! Don’t count me on that one!👀 I didn’t have any problems regarding streaks as the mitt helped massively!

Overall, although I don’t still use this product today, I would recommended it to anyone. It’s such a good quality tan, that’s can last a fair amount of time on the skin! Rating: 8/10 👅

5) St Moriz Tanning Foam and Mist


Words can not describe how much I LOVE this tan‼️ This is by far my favourite of all 5 by a mile! Everything about the tan I cannot fault. The colour is fantastic and whenever I self tan using this product, someone will always compliment me😍

There is only one tiny issue I’ve had with this product. Before application, you will have to make sure your skin is FULLY exfoliated! I cannot express this enough. If your skin type is dry then this product is not for you! The lotion itself is very dark first and sets lighter. If your skin is dry, the lotion will not apply at all or apply way too dark in that area. 👎🏽 My skin can become very dry from time to time so I always make sure to go a week where I’ve stripped the tan off my skin and fully cleansed my body. This gives my body a chance to soften. 

I have also found that the St Moriz tanning mist works a treat on a night out. The product is instant, therefore just apply a quick layer over the skin and let it sink in. This tan will wash off under water so do be careful! 

The following photos are the end results from the tan💓 


SO THERE YOU HAVE IT! Hope this helps any of you looking to top up the tan before bikini season! If not then thanks for reading anyway😉 I’ve got so many exciting blogs lined up that I’m constantly typing away whenever I get the chance! The last two weeks have been manic with my assignment due next week and celebrating my close friends birthdays. I’ll be sure to write up a blog weekly and get back into the swing of it all again! So many exciting things coming up which I cannot wait to share with you all 😘

Sophie xxx

KYLIE VS JEFFREE⁉️

NOWS ITS TIME FOR THE BIG DEBATE😲😲 hahah just kidding, but seriously which is better?! 2015 was the year teen Kylie Jenner made a huge success by bringing out her lipstick range, completely shocking the world. The lipsticks themselves are almost IMPOSSIBLE to get a hold of, but luckily with a lot of Twitter stalking and constantly checking my phone for updates, I managed to get my hands on two🙌🏽🙌🏽

So what makes Kylie’s lipstick so popular you ask? Well, the lipsticks claim to be 24 hour wear proof. Hrm… Can’t really say I agree? I was fortunate to get my hands on True Brown K and Mary Jo K. I am a huge lover for brown lips. Brown lips have definately made it big in the last year, with celebrities like Rihanna, Kylie and Gigi Hadid absolutely rocking the look👄

My other lipstick from the collection, Mary Jo K, was on of the recent releases. This colour was defiantly more of a surprise, with all the colours so far being pinks, nudes and browns.✨✨

RIGHT, so before I start the debate giving my own personal views on each of the products, its only fair I introduce the legend himself, Jeffree Star. Okay, so if you live in the UK, like myself, you may not have heard too much about Jeffree Star. I found out about Jeffree from my good pal Millies (follow her blog, i’ll link it at the bottom!! She’s a right crazy one).🤘🏽🍷🤘🏽

Jeffree wanted to created a lipstick brand, that guaranteed a strong colour, coverage and wearability. What makes his brand so unique would have to be the huge range of colours to choose from – like seriously any colour you can think of, he’s got it, and even better they all have amazing names!🌈🌈🌈

  
SO WHICH IS BETTER?

I celebrated my 18th birthday last month, 🍾🍾 to which I was very luckily given one of Jeffree’s lipsticks. The colour I received was ‘celebrity skin’. In the past, I had already trialled out ‘posh spice’, which is a very rich grey/brown colour, which I ADORED. 💓 After a lot of obvious hints, I managed to get my hands on one of the lipsticks. My initial reaction to this product was the smell. Honestly if ‘smellavision’ was a thing, you would all be thanking me. The smell is absolutely gorgeous. It smells so fruity and fresh, which is such a perfect taste when applying to the mouth area.😍😍

Next, the application. So the secret and fun of both of the products is that they apply as a liquid and dry matte. This is honestly so great for building up coverage and accurate application – any mistakes can be very easily removed. My first worry for this product would be that it would dry my lips out completely, but oh my goodness how i was wrong. The lipstick looks and feels so soft. The one downside would be that you do have to top the product every couple of hours, which come on… not much to ask eh?

 Kylie’s lipstick was something I always wanted from the minute they were first released. Living in the UK meant that purchasing was a lot harder as i had to work around the time difference. 😲😟 

I wasn’t lucky to get my hands on them the first time round, but I think it was either the second or third resale i nabbed True Brown and Mary Jo. If I’m completely honest, I did really want one of the nude colours, but they sold out within 5 minutes!! CRAZY BUSINESS. So I settled with these two, not complaining at all as i was finally making progress!👍🏽👌🏽

Actually receiving the products was a total nightmare. They had to be shipped from America, which not only delayed the delivery time, but also meant I had to pay can extra £15 pounds to be able to receive my gifts from the security office. What I mean by this, is that because these products were not recognised on the system when delivered, the security staff had to open my package to check everything was safe (which is fair I suppose)!!

After FINALLY getting my lippies, i ran into my car literally puling apart the packaging to reveal a damaged and shredded up box that the lip kits were meant to be prettily packaged in🙀🙀. This frustrated me so much, as it clearly showed how little the staff were being gentle with the package. By this point, I just bite my tongue and moved on; I was just so glad to finally have them.👀

When I got home that day, I trialled out the product. The little tubes are so so gorgeous. Kylie has really done a good job at designing the whole look! It came with a cute little postcard with a message from Kylie, which i thought was such a kind touch!☺️ The lip liners that came with both of the lipsticks are really good. They were so easy to use, and helped so much to create the full look. I would definately recommend always using a lip liner when applying such bold lipsticks. When I applied the lipsticks on my lips, I loved the initial feeling as you apply it wet and it sets dry. Once i was satisfied with the final look, I left it to dry. The first thing I noticed was how drying the product was! 😲 At first I thought I might be able to adjust to it, but after numerous times wearing the lipsticks again it got unbearable.😭😭

In the end, it resulting in me selling True Brown K.😪  Honestly I could not fault the pigmentation at all. The colours appeared so beautiful on the lips. I just found for me, I ended up licking my lips SO much it was ridiculous. The product itself didn’t even last that long on my lips; I’m narrowing this down to how much I would rub and lick my lips in frustration. I wanted to like the product but I really couldn’t. I still have Mary Jo K, as the colour was so pretty, and I found I didn’t have to apply as much as True Brown to receive a full and even coverage (this being to my lips being naturally quite red).

In my personal opinion Jeffree Star WINS HANDS DOWN!🏆🏆 The product was almost half the price of Kylie’s and I get so much wear out of it! Whenever I wear my Jeffree Star lipstick, I will always get complimented and people will always ask more about it! On the Jeffree Star website you can get so many colours which look like identical of Kylie’s products.

In my opinion, save your money and don’t follow the crowd, as you’ll be surprised how much better some of the more unknown brands can be!😽

Hope you enjoyed my own personal experience with products. I have defiantly had my fair share of trial and error when it comes to different products; leaving me with endless tales, so you will definitely be hearing more in the future.🤗😝😎

Sophie xxx 

Ps… MILLIE BLOG: miljules.wordpress.com 

 Photos below are linked to the colours mentioned in this blog: 


First time working with special fx👽👽

So as I’m on my first year of my course, we don’t learn anything about special fx till next year. (We only cover the basics but go into full depth later on) 🤘🏽🤘🏽

Today we were set a task to recreate the look of the Wizard of Oz characters and create a horror theme. Given the character Tin Man, I wanted to create a design which showed human flesh being torn away to reveal a tin face. 🔩🔧

To do this, I removed all the makeup off my very kind and offering model, and began applying latex with a sponge. It is important to remove all makeup off the skin so you have a clean base to start with. After applying a layer of latex, I waited a couple of second for it to dry, before scratching away areas to create holes. This sounds painful, but the latex creates a layer so you don’t feel anything when removing some of the product. I kept doing this process until I was satisfied with the build. Then I set the makeup with setting powder.  I wanted it to appear as if the face has been clawed/ripped off. 🙈

Originally I had designed the skin to look burnt, but when thinking about the process, the skin wouldn’t be able to melt effectively if there was metal underneath, therefore I decided to rethink my idea to something equally as gruesome. 🤔🙄

Next, I applied a layer of the Ben Nye cream foundation in a light shade using a foundation brush and sponge. After, I set again with the setting powder. I then began to take a stippling sponge and dab red and deep purple grease paint over the latex. This added a bloody effect to the skin. 💉

I decided to open up the holes in the flesh, and fill them with grey grease paint. This would give the appearence that the tin face was underneath this layer. I finished off my look by touching up the whole piece with some fake blood. 

Overall I am very happy with the look considering I had never been taught how to do this look. It is only a practice, so there is room for a lot of improvements. ☺️☺️☺️ 


 Ps… The left side of the face is not complete. I applied a thin layer of grey to see if the two looks contrasted well together. 🌚

About me😝

Hey!

Okay so before I decide to post any more blogs, I thought it was only right to talk a bit about myself! I am your typical makeup loving girl, studying a course called media makeup. I decided to write a blog because I wanted to share all my work with my friends and family, (or just the general public!) 😝 

I am new to this whole blogging thing, so please forgive me if there’s spelling mistakes or I talk about pretty much rubbish😂 

I am look into studying a HND media makeup degree after finishing my current course. I’m not too sure what I want to do when I’m older; I’m torn between being a self employed makeup artist or working with special fx on film and tv!👽👽 The past 6 months of my makeup course has definetely taught me that theatre makeup is not for me! As much as I love the fun of creating huge and exciting looks, I much prefer the pretty and detailed makeup which can be seen up close and personal!💅🏽

So… On this blog you can expect A LOT of makeup, some personal tips I’ve learnt over the past, and maybe a bit about my personal life.. Who knows. But stay tuned as I’ve got a lot of exciting ideas coming up✨✨✨

  
Sophie xx

Whats in my makeup kit?

12659769_1098541820185378_1801516194_n

Once staring my college course, we all had to play the fun and exciting waiting game for our makeup kits to arrive! Obviously due to our luck, the kits were delayed for about two weeks (which made the start of the academic year very frustrating and long). Having a makeup kit is vey essential to the course. The kit provided us with the basic equipment to get us started on the course. As the course develops, you will begin to add your own products, and find out which work best for you. This included a foundation palette, aqua paints, grease paints, brushes, eyeshadow palettes and many more. In the media makeup course, you will be taught how to style different hair looks. As a result, you will be given hair equipment in your kit. (The photo above only shows a selection of products)

Overall, I am happy with the products in my kit, but some of them stand out a lot more from the rest. The Ben Nye foundation palette and Setting Powder are some of my favourites. This is because of the high, professional quality the products provide. These two products are on the expensive side, therefore a lot of the budget was clearly spent on them. I would recommend only wearing these products on special occasions. This is because the foundation only holds on the face for a set amount of time, without beginning to rub off. This would be due to the creamy texture of the foundation; which when mixed with either dry, or oiler skin, can wear away. The Setting powder is absolutely fantastic, but can be very heavy on the face. For someone like myself, who has always struggled with spot prone skin, this product can block my pores, and dry out my face. (This would only become a big issue if i were to wear on a daily basis!!)

The DUO eyelash glue is incredible. Ever since using this product, no other glue compares! You are guaranteed with a strong and secure fix. This product drys quickly, without leaving any white marks (which is essential for a clean finish). Although the glue firmly keeps the lashes in place, the product is easy to remove the lashes from the eyes without causing any damage or pain. When cleaning your lashes, the glue is easy to remove, without tearing away any singular pieces.

The brush collection called Nanshy, is an averagely good brand. The larger brushes in the collection are defiantly good for a flawless finish. The large powder brush works well with the Ben Nye Setting powder as it evenly disperses the product over the face. The stippling brush in the collection works well to contour the face, without absorbing too much of the product. One of the main issues when choosing the correct foundation brush, would be ensuring you are not going to waste your product. A lot of foundation brushes can be known for soaking up the product, rather than applying to the face. You may not notice this at the time, but when its comes to cleaning your brushes, your left with a thick layer of foundation dripping of the brush, and down the drain… not good! I find that the smaller brushes are a lot denser, which can become a lot harsher on the skin. These smaller brushes work very well with acrylic and grease paints, as they are not too soft to soak up the product; but for everyday, flawless looks, they can feel sharp around the eyes.

Overall, i am happy with my kit. It all came in a bag from EMJ Company, which is such a fantastic brand. (Ill do a blog later on, as there is so much to write!!) My college have selected a huge variety of products, which can achieve almost any look. I am excited for all the designs i am going to create in the future, and ill be sure to keep you up to date.

Sophie xx